Add your custom image to DigitalOcean with Vmware Fusion

I run my Chef cookbooks on DigitalOcean. Only problem is, when the OS isn’t supported anymore DO removes it from their supported images.

DO created something what they call: Custom Images.

I created this vm with Vmware Fusion, because i have it installed om my laptop.

    1. Start Fusion and choose to create a custom install.
    2. DO bills you for the amount of diskspace you use, so we will keep the image as small as possible. I managed to get it inside a 1GB image, 2GB would be easier. Click customtize settings before finishing. When choosing the size click on advanced options and deselect Split into multiple files

These are my options during the installer.

    1. Language → English
    2. Country → Other → Europe → Belgium
    3. Locales → United States
    4. Keymap → american English
    5. Hostname → debian
    6. Partitioning → Manual → Remove all partitions, and create only 1 partition


    7. package survery → no
    8. Grub boot loader → yes
      1. Grub boot loader → /dev/sda
    9. echo -e “/dev/vda1\t /\t ext4\t errors=remount-ro\t 0\t 1” > /etc/fstab
    10. reboot the server

Last steps before uploading.

  1. apt-get update
  2. apt-get upgrade
  3. apt-get dist-upgrade
  4. apt-get clean
  5. apt-get install sudo openssh-server
    1. Digitalocean uses cloud-init to configure the images. Cloud-init depends on some python packages. The latest version in debian jessie doesn’t support DO yet, which makes the initializing process slow. As the cloud-init package doesn’t have any wierd dependecies i just wget the package.
    2. apt-get install gdisk python3-configobj python3-configobj python3-jinja2 python3-jinja2 python3-jsonpatch  python3-jsonschema python3-oauthlib python3-requests python3-six python3-yaml python3-serial
    3. cd /tmp
    4. wget http://nl.archive.ubuntu.com/ubuntu/pool/main/c/cloud-init/cloud-init_18.5-45-g3554ffe8-0ubuntu1~18.04.1_all.deb
    5. wget http://ftp.nl.debian.org/debian/pool/main/c/cloud-utils/cloud-guest-utils_0.29-1_all.deb
    6. dpkg -i cloud-guest-utils_0.29-1_all.deb
    7. dpkg -i cloud-init_18.3-5_all.deb
Posted by Bram in chef, debian, digitalocean, opscode, vmware

Vmware passthrough nvidia gt 710

One of my customers needed a way to use 4 monitors on his vmware server.

There where 2 Geforce GT710’s available. We don’t need high end 3D stuff.

To get this working i had to put the 2 cards in passthrough mode.

To do this go to Host -> Manage -> Hardware, check both cards and click on Toggle passthrough.

Now the cards will show up when you edit the VM.

Shut down the vm, if it’s running, and go to edit settings, click on add other device, and choose the pci devices where you enabled the passthrough.

On the gt 710 devices you need to put some extra options, otherwise the passthrough doesn’t seem to work.

In the settings menu go to VM Options -> Advanced -> Configuration Parameters: Edit Configuration

Add these parameters:

hypervisor.cpuid.v0 = FALSE
pciPassthru.use64bitMMIO=”TRUE”
pciPassthru.64bitMMIOSizeGB = “64”

I found this on the internet about the pciPassthru.64bitMMIOSizeGBs setting.

Specifying the 2nd entry requires a simple calculation. Count the number of high-end PCI devices(*) you intend to pass into the VM, multiply that number by 16 and then round up to the next power of two. For example, to use passthrough with two devices, the value would be: 2 * 16 = 32, rounded up to the next power of two to yield 64. For a single device, use 32. Use this value in the 2nd entry:

Posted by Bram in sysadmin, vmware

Directadmin + LetsEncrypt AH01895: Unable to configure verify locations for client authentication

When directadmin fails to restart and you see this in your apache error_log

[Mon Feb 13 00:27:08.010103 2017] [ssl:emerg] [pid 23113:tid 139658483275584] AH02311: Fatal error initialising mod_ssl, exiting. See /var/log/apache2/xxxx/xxx.be.error.log for more information
AH00016: Configuration Failed

if you take a look in /var/log/apache2/xxxx/xxx.be.error.log and something like this appears

[Mon Feb 13 00:27:02.014701 2017] [ssl:emerg] [pid 22949:tid 140381588760384] AH01895: Unable to configure verify locations for client authentication

Take a look if the cacert file for that domain isn’t empty, my file looked like this:

-----BEGIN CERTIFICATE-----
-----END CERTIFICATE-----

If the file is empty, you’ll have to manually try to renew the domain until it works.

cd /usr/local/directadmin/scripts/
./letsencrypt renew xxxx.be 4096

First time i ran the command i saw this message:
Generating RSA private key, 4096 bit long modulus
....................................................++
.................................................................................................................................................................................................................................................................++
e is 65537 (0x10001)
Size of certificate response is smaller than 500 characters, it means something went wrong. Printing response...
"detail": "JWS has no anti-replay nonce"

third time i got a message the certificate has been created successfully.

Posted by Bram in directadmin, letsencrypt

Using ubuntu stock kernels on OVH

One of my clients wanted to host his vm’s on OVH. So we ordered a dedicated server and i began to setup XEN on it.

As they depend on a recent ixgbe module i had some problems with the networking, after booting the server with a 3.x stock kernel the ipmi wasn’t working.

This is how it worked for me

* Install latest 4.xx kernel (mine was 4.2.0-34-generic )
* cd /usr/src/
* Download latest ixgbe package: wget https://sourceforge.net/projects/e1000/files/ixgbe%20stable/4.3.13/ixgbe-4.3.13.tar.gz

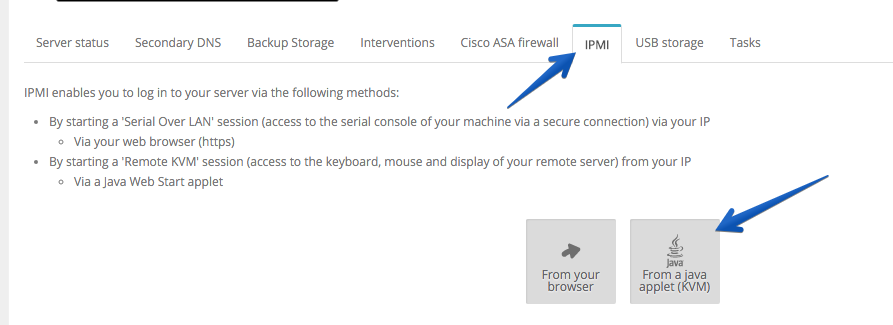
Now go into the webmanager tool and open a ipmi kvm session.

ovh control panel

* Reboot the server once you are connected to the ipmi

Time to build the new driver
* cd /usr/src/ixgbe-4.xx
* make
* make install

Time to test it
* rmmod ixgbe
* modinfo ixgbe | grep version
You should see something like “version: 4.3.13”

Where the version should match the version of the file you downloaded

If this looks oke, load the module using modprobe

* modprobe ixgbe

you should now have a working internet connection.

Now it’s time to rebuild the initramfs package so the new module is loaded when we reboot the server.

* uname -r
should give you the kernel name, something like “4.2.0-34-generic”

* update-initramfs -k 4.2.0-34-generic -u

reboot and your internet should work.

Posted by Bram in ovh, sysadmin, ubuntu

preferring ipv4 instead of some ipv6 connections

One of my clients had a problem when he tried to connect to the google maps api using ipv6, there where no problems when i curl the url over ipv4.

As i can’t control the connection the routing to google, i was looking for a alternative solution and found out you can manipulate which address your server prefers.

Something exists called gai.conf, this hooks into the getaddress function.

So i had to block ipv6 requests to 2a00:1450:4013:c01::5f , the easy way is to disable all ipv6 requests.

If you are looking for this, just uncomment this line, and restart the program that is opening a connection.

#precedence ::ffff:0:0/96 100

This is the easy way, and i don’t want to disable all ipv6 connections, so i went ahead and played a bit more.

This was the solution i ended up with.

precedence ::1/128 50
precedence ::/0 40
precedence 2002::/16 30
precedence ::/96 20
precedence ::ffff:0:0/96 10
precedence 2a00:1450::/32 0

You want to uncomment these lines, if you don’t do this, you will block all ipv6 requests again.

Posted by Bram in debian, ipv6

Harvest export invoices.

If you use Harvest and need to export your invoices every time you need to file your taxes, you know the time it takes to select only the invoices you need.

To speed things up a little i looked at some cli scripts to help me.

First you need to install xquartx and pdfgrep. I install these packages with brew.

If these packages are installed go to the folder where all your invoices al stored.

  1. Move all invoices made from 01-03 into the folder 2015-Q1, make sure you created the folder first.
  2.  mkdir 2015-Q1

    for i in `pdfgrep -H  "Factuurdatum[ ]*[0-9]{2}/(01|02|03)/2015" *.pdf  | cut -d: -f1`; do mv $i 2015-Q1/; done

  3. Now we will change the default harvest name into $invoice-number.pdf
  4.  IFS=":"

    pdfgrep -H "Factuurnummer" *.pdf | sed -E "s/Factuurnummer[ ]{0,}//g" | while read pdf id ; do mv $pdf $id.pdf; done

  5.  Merge all pdfs’s
  6.  pdfunite 2015-*.pdf Q1.pdf

Posted by Bram

tugboat gem

Recently i was writing tests for all my chef cookbooks and it became time for testing them.

There are a lot of options to test everything, i chose  to use digitalocean to test everything.

I found a nice little gem called tugboat which gives you all the regions and images that are available.

To install the gem just run “gem install tugboat” and then run “tugboat authorize”

The authorize steps will ask you some api questions, like what is your client key and your api key.

To find both keys you’ll need to go to https://cloud.digitalocean.com/api_access

Click on the generate key button to get your api key. Don’t mix this with the apps & api link in the default menu, as these keys won’t work.

Posted by Bram in chef, opscode, tugboat

Security ubuntu feisty package: Bash

Because i have this one server which is still running ubuntu feisty, I had to build my own bash packages to prevent the system from becoming to be abused using the shellshock bug.


The package can be download here.

The tar with the source can be downloaded here.

Posted by Bram in sysadmin, ubuntu

Libreoffice label templates

I’m runing LibreOffice on my mac and i’m the sucker at the office to always print the new labels.

I recently reinstalled my laptop and lost my label settings, it took me a while to find where LibreOffice saves the templates but i finally found it.

Turn of your LibreOffice, and on your old disk go to

cd /backup_pad/Users/<username>/Library/Application\ Support/LibreOffice/3/user

Copy the file to your new disk.

cp registrymodifications.xcu ~/Library/Application\ Support/LibreOffice/3/user

Restart LibreOffice and you should find the labels you made again.

Posted by Bram in LibreOffice

Retrieving your private SSL key with IIS 7

Open the MMC window ( start -> run -> mmc) and go to file -> add/remove snap-in, choose certificates from this list. Click on Add and choose Computer account in the list.

Click Next and select Local computer, and click Finish and then Ok.

Go to Certificates (local computer) -> personal -> certificates.

On the existing SSL certificate, right mouse click -> all tasks -> export. Enable Export the private key and follow the next steps. (to check, is dit niet voor import?)

So now we have an encrypted pfx file, to retrieve our private SSL key use these commands.

openssl pkcs12 -in publicAndprivate.pfx -nocerts -out privateKey.pem

This outputs the private key, but this still has a password.

openssl rsa -in privateKey.pem -out private.pem

Now we have our private key in a clear text file.

Posted by Bram